<![CDATA[jwallace.us]]>2016-08-07T00:44:16-05:00http://jwallace.us/Octopress<![CDATA[Common Linux Sysadmin Commands]]>2016-08-05T13:41:30-05:00http://jwallace.us/blog/2016/08/05/common-sysadmin-commandsI am constantly having to use these commands when administering remote systems. I’ll just put them in one place for future reference.
Change all directories and subdirectories to a specific user and group
find . -type d -exec chown user:group {} +
Change all files in the current directory and all subdirectories to a specific user and group
find . -type f -exec chown user:group {} +
Setting the time zone
dpkg-reconfigure tzdata
Generate a 4096 byte SSH key
ssh-keygen -t rsa -b 4096 -f id_rsa_user -C user
]]><![CDATA[Clinton Cash]]>2016-07-29T14:42:00-05:00http://jwallace.us/blog/2016/07/29/clinton-cash
]]><![CDATA[Upgrading to Windows 10]]>2016-06-23T17:04:06-05:00http://jwallace.us/blog/2016/06/23/upgrading-to-windows-10The deadline for installing Windows 10 as a free upgrade is July 29. You may have heard Microsoft made it free because Microsoft sees it as a tool to gather information about you so they may sell it for profit. So it remains, nothing is rarely ever free and there always seems to be a catch. When upgrading, follow these steps to minimize Microsoft’s snooping into your life.
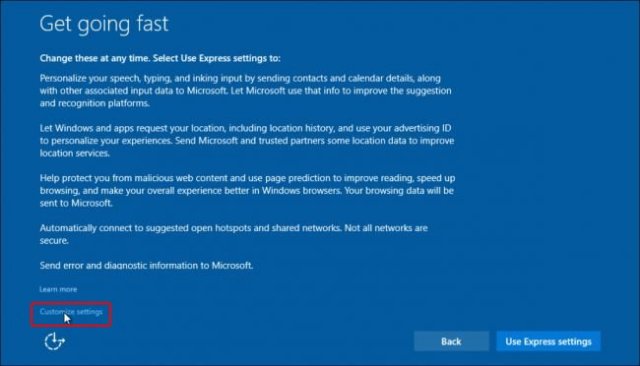
When upgrading, you will first be given the option to customize your installation settings. If you go too fast, you’ll miss it. The customize settings is in small text at the bottom left. Choose that.
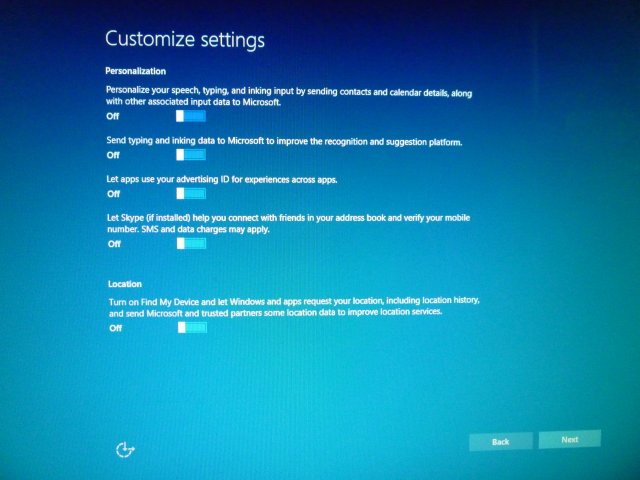
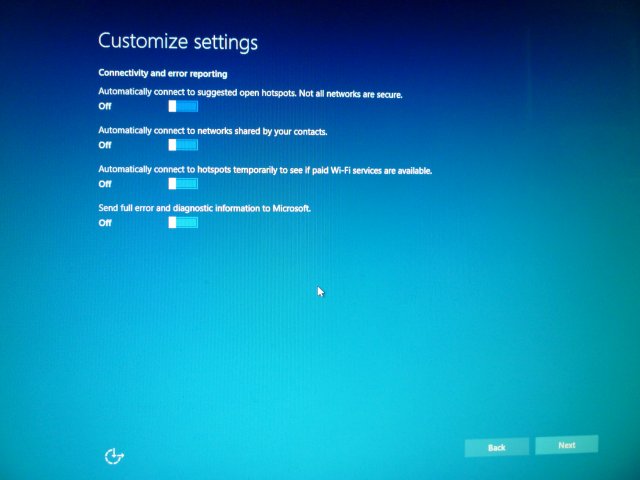
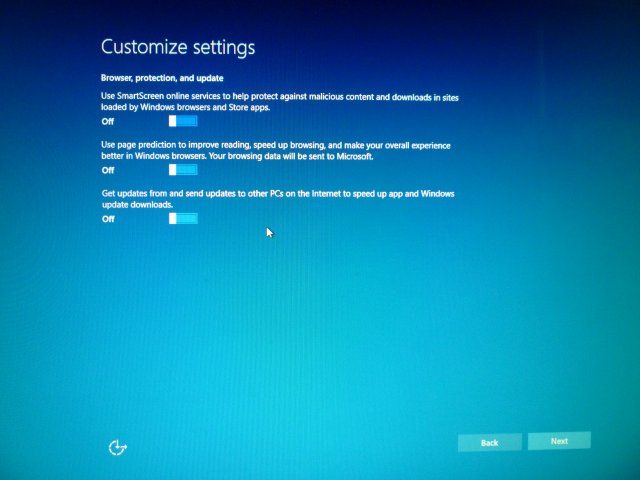
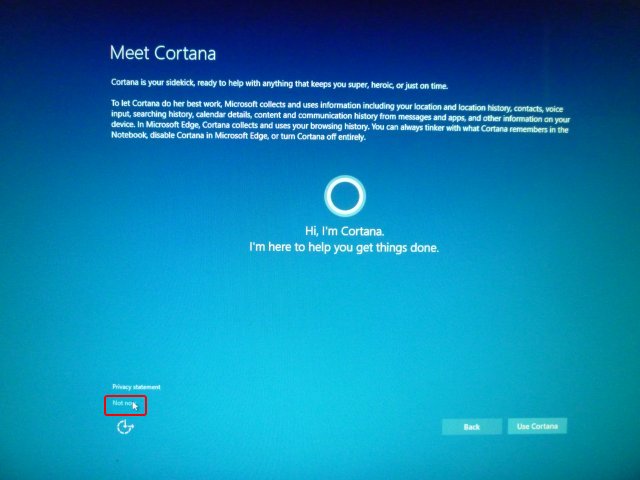
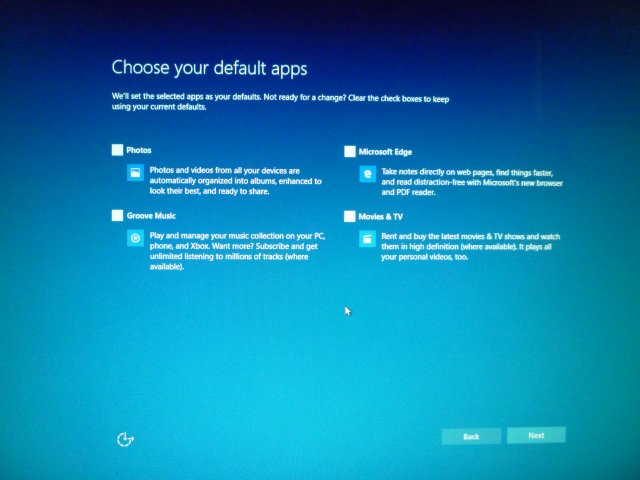
Next you will be presented with these screens. Make the choices shown below.
You don’t want Cortana.
Be sure to choose your default apps yourself.
After upgrading, download, install, and run ShutUp10 choosing the recommended settings:
Overall I think Windows 10 is a decent operating system provided you set it up correctly and minimize Microsoft’s spying.
]]><![CDATA[Donald Trump's Anti-Hillary Speech]]>2016-06-22T17:05:29-05:00http://jwallace.us/blog/2016/06/22/donald-trumps-anti-hillary-speech
]]><![CDATA[Crooked Hillary]]>2016-06-08T17:04:30-05:00http://jwallace.us/blog/2016/06/08/crooked-crooked-hillaryCrooked Hillary becomes the Democrat party’s nominee.
Note the God-like glow. She had CNN do that for her.
What a phony.
]]><![CDATA[Adobe to Apache Flex]]>2016-03-31T09:35:26-05:00http://jwallace.us/blog/2016/03/31/adobe-to-apache-flexSome time ago Adobe open sourced their Flex programming language over to Apache. I have some old Adobe Flex based programs that I wanted to move over to using the new Apache Flex. After downloading the new SDK, I tried to compile the Flex source code, and I was presented the following error message:
Error: unable to open '{playerglobalHome}/11.1/playerglobal.swc
The fix for this error is to go into the Apache Flex SDK installation directory and do the following.
Finally, edit the env.properties file and find the env.PLAYERGLOBAL_HOME setting. Change it to the path that contains the :
123456789101112131415
#
# PLAYERGLOBAL_HOME is a directory which contains one or more subdirectories.
# The name of each subdirectory corresponds to a supported target player version and
# in each of the subdirectories is the playerglobal.swc that corresponds to that target
# player.  The default
#
# For this sample directory structure, set PLAYERGLOBAL_HOME to the full path of the
# player directory.
#
#       - player (dir)
#           - 11.1 (dir)
#               playerglobal.swc (file)
#
#env.PLAYERGLOBAL_HOME=
env.PLAYERGLOBAL_HOME=/home/john/apache-flex-sdk-4.15.0-bin/frameworks/libs/player/
You’re done. To test this you can compile the sample program below.
Use the following command to compile:
mxmlc -compiler.optimize -compiler.as3 FlashVersion.mxml
]]><![CDATA[Automated PostgreSQL Backups]]>2016-02-11T13:25:18-06:00http://jwallace.us/blog/2016/02/11/automated-postgresql-backupsYou can use the linux scheduler cron to automate backups of your postgres database. First as root, you’ll want to log in as the postgres user since we’ll be doing a number of things in that account:
su - postgres
Assuming you have a database named “mydb”, lets set up a small script in the postgres account. On Ubuntu & Linux Mint the account is in /var/lib/postgresql, and on Red Hat & CentOS you’ll find it in /var/lib/pgsql. For now, lets assume Ubuntu. Here is the script:
Make sure you give your script execute permissions:
chmod 755 db_backup.sh
You also want to create the backups directory where your sql dump will be archived:
mkdir backups
Next you’ll need to set up our postgres credentials in a .pgpass file:
/var/lib/postgresql/.pgpass
1
localhost:5432:mydb:postgres:dbPa$$w0Rd
You will need to set the parmissions for .pgpass to 600.
chmod 600 .pgpass
Also, since cron will run as root, you’ll need to copy the .pgpass file over to root’s home directory:
sudo cp .pgpass ~root
Finally, you’ll want to run “crontab -e” as root to schedule when your new backup script will run. This entry will have the system run the script at 00:00:00 every day:
@daily /var/lib/postgresql/db_backup.sh
]]><![CDATA[Tomcat 7 HTTPS With No CA]]>2016-02-09T15:12:43-06:00http://jwallace.us/blog/2016/02/09/tomcat-7-https-with-no-caYou can create a self signed server certificate and a server key for Tomcat without having to go through a certificate authority. First, create the certificate and key:
<!-- Define a SSL Coyote HTTP/1.1 Connector on port 8443 --><Connectorprotocol="org.apache.coyote.http11.Http11Protocol"port="8443"maxThreads="200"scheme="https"secure="true"SSLEnabled="true"keystoreType="PKCS12"keystoreFile="/var/lib/tomcat7/conf/my_cert.p12"keystorePass="djEwuDysjSIdc88w3"clientAuth="false"sslProtocol="TLS"/>
Finally, edit Tomcat’s web.xml, at the bottom add a security restraint to force all connections to use HTTP/s:
]]><![CDATA[Getting Iron to Work With Thunderbird]]>2016-01-12T11:05:27-06:00http://jwallace.us/blog/2016/01/12/getting-iron-to-work-with-thunderbirdFirst set Iron to the default browser:
]]><![CDATA[Happy Days Are Here Again]]>2015-12-16T15:48:39-06:00http://jwallace.us/blog/2015/12/16/happy-days-are-here-againThe Fed raised interest rates today for the first time since the beginning of the Great Recession. Do you know what that means? I think you do.
]]><![CDATA[Linux Apps Not in the Repository]]>2015-12-07T11:43:55-06:00http://jwallace.us/blog/2015/12/07/linux-apps-not-in-the-repositoryHere are a few Linux applications that I like that you won’t find in your distribution’s repository:
]]><![CDATA[Tomcat 7 HTTPS Setup]]>2015-10-26T13:33:26-05:00http://jwallace.us/blog/2015/10/26/tomcat-7-https-setupFirst you will need a server certificate. There are a couple of ways to get one. The certificate format is x509. Thats all good, however the choice you need to make is what type of keystore (container) you wish to store the certificate AND key. You basically have two choices: JKS or PKCS12
If you choose a JKS keystore, then the easiest thing to do is to create your own key using the keytool.
So, to create a JKS keystore from scratch, issue these two commands:
This will create the “my_keystore” container, and store within it a self generated key with the alias “tomcat” and you will be good to go after you edit server.xml and web.xml (see below).
FYI if you ever need to delete the certificate, you can do it with this command:
Now, lets say you don’t want to use the keytool generated certificate, but you would rather use one from a certificate authority such as CAcert. After deleting the keytool generated certificate, you will want to import your key that we created from cacert.org:
…and then import the new one as before,
Finally, to list the keys in the keystore, issue the following command:
keytool -list -keystore my_keystore
THERE IS JUST ONE PROBLEM. The keytool utility has no facility for simply importing a key! Amazing.
So now what do you do? Well, the easiest solution is to just use a PCKS12 keystore, but you’ll have to tell Tomcat its PCKS12 as Tomcat defaults to JKS. So here is the command:
your certificate from CAcert: server.crt
your key from CAcert: server.key
the PCKS12 keystory to be created: my_cert.p12
CAcert's root certificateL cacert/root.crt
In server.xml find the section with the comment “Define a SSL HTTP/1.1 Connector on port 8443” and define the following (around line 90):
/var/lib/tomcat7/conf/server.xml
12345
<!-- Define a SSL Coyote HTTP/1.1 Connector on port 8443 --><Connectorprotocol="org.apache.coyote.http11.Http11Protocol"port="8443"maxThreads="200"scheme="https"secure="true"SSLEnabled="true"keystoreType="PKCS12"keystoreFile="/var/lib/tomcat7/conf/my_cert.p12"keystorePass="2yQknGdBtBKo"clientAuth="false"sslProtocol="TLS"/>
Next if you want to enable UTF-8 responses, make sure the URIEncoding is properly set (around line 75):
Next, to force re-direction of all HTTP traffic to HTTP/S, you will need to add a security-restraint element at the bottom of the web.xml file. This will be just below the welcome-file-list element and right above the web-app element. The very bottom of your web.xml file should look like this:
]]><![CDATA[Server Certificates]]>2015-09-21T12:36:24-05:00http://jwallace.us/blog/2015/09/21/server-certificatesNeed a new certificate for your Apache or Nginx web server? These are the steps you’re looking for.
First you’ll need a certificate signing request (CSR). To get that you’ll first need a key.
During creation of the CSR you will be asked a few questions. You can ignore “Organizational Unit Name”. One you definitely cannot ignore is Common Name. That is your domain, so when asked for common name enter your domain (eg: mydomain.com). You will be asked for “A Challenge Password”. Leave this one blank unless you will be there to type in the password when your web server starts up. In most cases, you won’t be so leave it blank.
Now go to your certificate authority such as CACerts.org. When you generate a new certificate, it will ask you for the CSR. Just cut & paste it into the text area when asked. With that you will be given a new certificate. Place your new certificate and key into the appropriate web server directory. Be sure to give the key 600 permissions, and the key’s group and owner should be the same as the web server. The certificate should have 644 permissions.
]]><![CDATA[Linux Mint Distro Upgrade]]>2015-09-18T14:00:31-05:00http://jwallace.us/blog/2015/09/18/linux-mint-distro-upgradeTo upgrade your Linux Mint distribution from the commandline, perform the following steps. In this case, we’ll be upgrading 17.1 (Rebecca) to 17.2 (Rafaela):
]]><![CDATA[Windows 10]]>2015-09-10T12:19:33-05:00http://jwallace.us/blog/2015/09/10/windows-10This is a simple reference posting about all things Windows 10.
This is a list of Microsoft update KB numbers to uninstall based on the articles listed above:
OS Versions
KB Number
Description
To Uninstall
7
2670838
unknown purpose – can break AERO functionality
wusa /uninstall /kb:2670838
7
2977759
System scanner
wusa /uninstall /kb:2977759
7
3035583
Get Windows 10 nagware program GWX
wusa /uninstall /kb:3035583
7
3083710
Update client, unknown purpose
wusa /uninstall /kb:3083710
8
2976978
unknown purpose
wusa /uninstall /kb:2976978
7, 8.1
2505438
unknown purpose
wusa /uninstall /kb:2505438
7, 8.1
2952664
Microsoft snooping patch – triggers telemetry runs
wusa /uninstall /kb:2952664
7, 8.1
3021917
unknown purpose
wusa /uninstall /kb:3021917
7, 8.1
3022345
Diagnostics and Telemetry tracking service
wusa /uninstall /kb:3022345
7, 8.1
3035583
unknown purpose
wusa /uninstall /kb:3035583
7, 8.1
3068708
Diagnostics and Telemetry tracking service
wusa /uninstall /kb:3068708
7, 8.1
3075249
Diagnostics and Telemetry tracking service
wusa /uninstall /kb:3075249
7, 8.1
3080149
Diagnostics and Telemetry tracking service
wusa /uninstall /kb:3080149
8.1
2976978
System scanner
wusa /uninstall /kb:2976978
8.1
3083711
Update client, unknown purpose
wusa /uninstall /kb:3083711
]]><![CDATA[Wacken 2015: Uli Jon Roth]]>2015-08-01T16:58:21-05:00http://jwallace.us/blog/2015/08/01/wacken-2015-uli-jon-rothA blast from the past:
]]><![CDATA[What Is a Bail-in, and Why Should I Care?]]>2015-04-12T19:13:13-05:00http://jwallace.us/blog/2015/04/12/what-is-a-bail-inThe next financial crisis worn’t be known for its bank bail-outs, but will be known for its bail-ins. You may be asking, um wut’s a bail-in? A bail-in is when the bank can (and will) take your money from you. Its all legal stealing. Read on..
]]><![CDATA[No to FCC Control of Net]]>2015-02-25T13:38:22-06:00http://jwallace.us/blog/2015/02/25/no-to-fcc-control-of-netBeats me why anyone thinks the government can regulate the internet any better than anything else. What we need is to keep the internet free and open. Private industry should be in control of it.
I like what Milton Friedman had to say about government regulation: “If you put the federal government in charge of the Sahara Desert, in 5 years there’d be a shortage of sand.”
]]><![CDATA[eMusic Download Manager for Linux]]>2015-01-23T18:52:53-06:00http://jwallace.us/blog/2015/01/23/emusic-download-manager-for-linux
I am an eMusic subscriber, but I also run Linux Mint 17.1 as my primary desktop operating system. You may be surprised to learn that eMusic actually does have a Linux version of their download manager available, but they have made it darn near impossible to find it and have no instructions how to use it. If you’re looking for this information, then here it is:
First you’ll need the eMusic download manager. You only need one of these:
Open the file with something like Archive Manager. This will extract the emusic-dlm executable. There is no installer or package. Simply extract it and put it into a folder of your choosing. Mine is in $HOME/emusic
Next, you’ll need to download and set a cookie so your browser will know how to interact with emx files. The emx file is what you’ll download when you download a track or an entire album.
Next, buy a track or album. When the “Your Music Is Now Downloading” screen appears, the browser will prompt a download for “0.emx”. When you open it, the OS should prompt you to choose an application to handle it… choose the emusic-dlm executable you extracted earlier. It should start downloading immediately.
Alternate instructions in case you didn’t find the preceding paragraph useful:
After downloading the emx file with your browser, right click on it and choose “Open With…” and then choose “Open with another application”. A new window will pop up. At the bottom you’ll see “use a custom command”. Choose that then click the “Browse”. Find the emusic-dlm app and choose that. Your music should begin downloading right away.
]]><![CDATA[Good People and Problem Clients]]>2015-01-20T20:35:16-06:00http://jwallace.us/blog/2015/01/20/good-clientsIt is possible that a good person can be a problem client. As a freelancer it is important that you know how to spot these characters or they can end up costing you money.
I found this video on YouTube. It is a good reference on how identify these clients and how to (and when not to) deal with them. I am of the opinion that in most cases you’re better off without them.